
Channels are a medium that the goroutines use in order to communicate effectively. It is the most important concept to grasp after understanding how goroutines work. This post aims to provide a detailed explanation of the working of the channels and their use cases in Go.
Golang Channels syntax
In order to use channels, we must first create it. We have a very handy function called make which can be used to create channels. A channel is dependent on the data type it carries. That means we cannot send strings via int channels. So, we need to create a channel-specific to its purpose.
Here’s how we create channels. The chan is a keyword which is used to declare the channel using the make function.
// a channel that only carries int
ic := make(chan int)
To send and receive data using the channel we will use the channel operator which is <- .
ic <- 42         // send 42 to the channel
v := <-ic        // get data from the channel
Zero-value of a channel
A channel that is not initialized or zero-value is nil.
var ch chan int
fmt.Println(ch)    // <nil>
Working with channels
Now, we will try sending and receiving data using channels. Let’s start by creating a basic goroutine that will send data via a channel which we will be receiving from the main goroutine.
package main

import (
	"fmt"
)

func SendDataToChannel(ch chan int, value int) {
	ch <- value
}

func main() {

	var v int
	ch := make(chan int)     // create a channel

	go SendDataToChannel(ch, 101)   // send data via a goroutine

	v = <-ch                        // receive data from the channel

	fmt.Println(v)       // 101
}
Here, in this example, we send data via a goroutine and receive data accordingly. Now, we will try sending custom data such as a struct.
Sending custom data via channels
Custom data can be sent just like any other data type. When creating and using the channels we need to be aware of using the correct data type when creating the channel. Here is an example that sends a Person struct via a channel.
package main

import (
	"fmt"
	// "time"
)

type Person struct {
	Name string
	Age  int
}

func SendPerson(ch chan Person, p Person) {
	ch <- p
}

func main() {

	p := Person{"John", 23}

	ch := make(chan Person)

	go SendPerson(ch, p)

	name := (<-ch).Name
	fmt.Println(name)
}
The send and receive operation
Tha channels operations are by default blocking. That means when we use any of the send or receive operation the channels blocks unless the work is done. Thus allowing them to be synchronized.
Using directional channels
Channels can be unidirectional. That means channels can be declared such that the channel can only send or receive data. This is an important property of channels.
package main

func f(ch chan<- int, v int) {
	ch <- v
}

func main() {
        // send-only channel
	ch := make(chan<- int)

	go f(ch, 42)
	go f(ch, 41)
	go f(ch, 40)

}
In the code above, we use a channel which is a send-only channel. That means data can only be sent into it but when we try receiving any data from the channel it produces errors.
The syntax is as follows:
ch := make(chan<- data_type)        // The channel operator is after the chan keyword
                                    // The channel is send-only

ch := make(<-chan data_type)        // The channel operator is before the chan keyword
                                    // The channel is receive-only
Closing a channel
A channel can be closed after the values are sent through it. The close function does that and produces a boolean output which can then be used to check whether it is closed or not.
package main

import "fmt"

func SendDataToChannel(ch chan string, s string) {
	ch <- s
	close(ch)
}

func main() {

	ch := make(chan string)

	go SendDataToChannel(ch, "Hello World!")

	// receive the second value as ok
	// that determines if the channel is closed or not
	v, ok := <-ch

	// check if closed
	if !ok {
		fmt.Println("Channel closed")
	}

	fmt.Println(v) // Hello World!
}
Using a loop with a channel
A range loop can be used to iterate over all the values sent through the channel. Here is an example showing just that.
package main

import "fmt"

func f(ch chan int, v int) {
	ch <- v
	ch <- v * 2
	ch <- v * 3
	ch <- v * 7
	close(ch)
}

func main() {

	ch := make(chan int)

	go f(ch, 2)

	for v := range ch {
		fmt.Println(v)
	}
}
This program produces an output shown below:
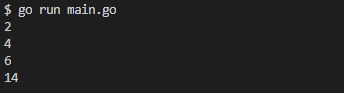
As we can see, that the loop is done over all the values the channel sends. The program outputs as expected. The channel also should be closed after sending the values.